
06 Jul Publicamos Wintriage v.03072023! / Released Wintriage v.03072023!
¡Llega una nueva versión de WinTriage!
The latest release of Wintriage is here! (English version here).
Como solemos acostumbrar, cuando acumulamos un paquete de mejoras para Wintriage y sacamos un tiempo para implementarlas y probarlas, liberamos al público una nueva versión. En este caso se trata de la 03072023.
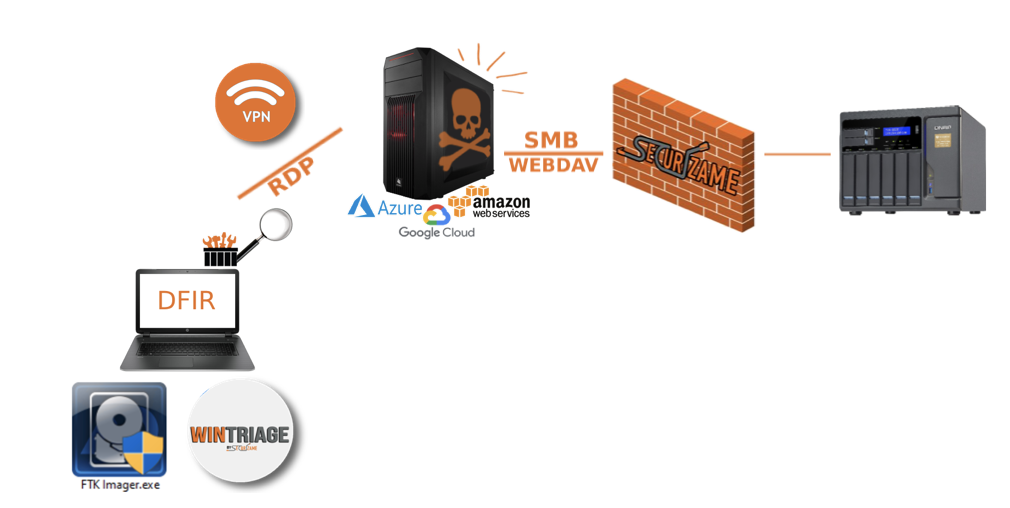
Habitualmente, Wintriage se usa dentro de un dispositivo externo de almacenamiento (un pendrive o un disco duro extraíble) que conectamos por USB a un equipo, ya sea un PC o un servidor. Sin embargo, también se da el caso que no siempre es posible disponer de alguien para ello, o que la máquina víctima se encuentra albergada en algún tipo de proveedor en la nube, no pudiendo conectar un dispositivo USB. En estos casos se puede disponer de un volumen que solicitar al cliente que «conecte» a la máquina víctima, pero esto ya implica una labor que, en una crisis, no siempre se resuelve en el tiempo deseable. Para estas casuísticas, en Securízame lo que hacemos es disponer de un repositorio compartido por SMB y NFS hacia Internet al que permitimos en nuestros firewalls la dirección IP de salida de la máquina víctima, y mapeamos este recurso desde esta para poder contar con un repositorio donde dejar los datos extraídos por Wintriage, sin tener que escribir ni un fichero en la máquina víctima.
Asimismo, cuando nos conectamos a la máquina, vía Escritorio Remoto, solemos enviar una unidad/carpeta del PC del analista en la que se tenemos diferentes herramientas que seguramente usaremos: Wintriage, FTK Imager, Nirlauncher, etc,…
Se puede ver a continuación una representación gráfica de lo explicado.
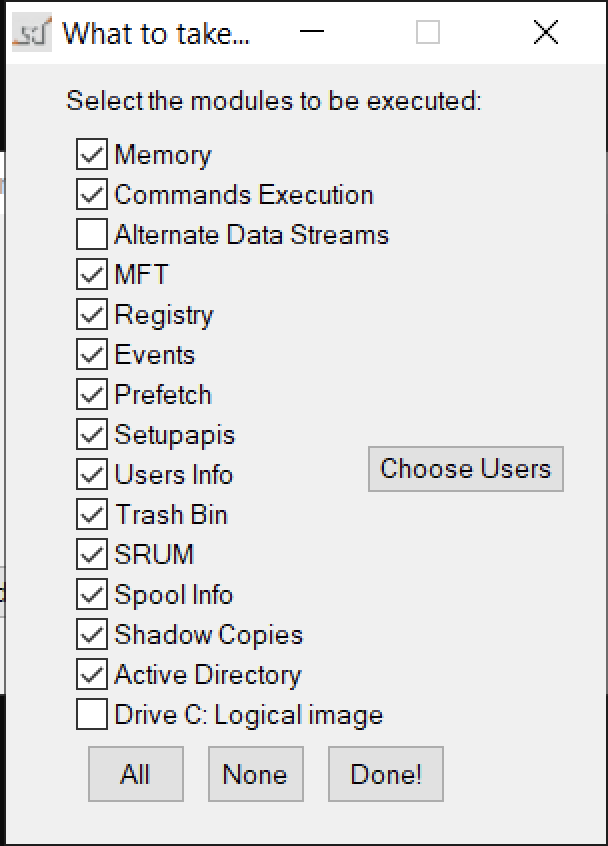
Hasta la versión actual de Wintriage, había ciertas opciones de triage que no podíamos seleccionar en esta modalidad, puesto que fallaban por diferentes motivos. Ahora ya funcionan todas!
A continuación describimos qué aporta esta nueva versión de Wintriage:
Nuevas funcionalidades añadidas:
-
- Compatibilidad total de extracción de artefactos forenses, incluso ejecutándolo desde un «tsclient».
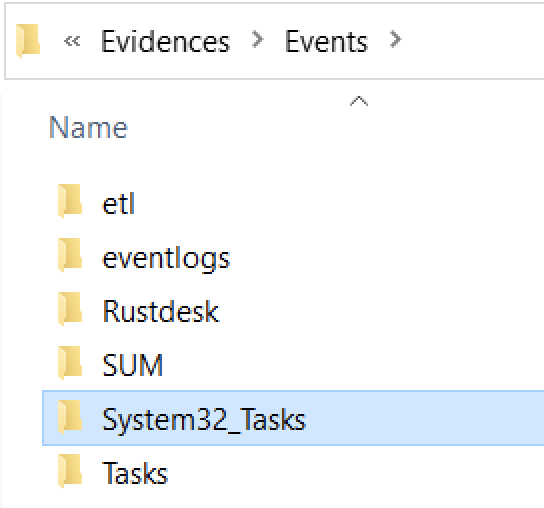
- Ahora extraemos también el contenido de C:\Windows\System32\Tasks y C:\Windows\Tasks. Para esto hay que seleccionar la opción de extracción de «Eventos».
-
- Como sugerencia de Víctor Martínez, un analista forense que nos escribió, se añade en la ejecución de comandos «powercfg /sleepstudy» en los casos en los que exista, que genera fichero sleepreport.html en el directorio «Informes» con información sobre momentos de no actividad de equipo (pueden servir para conocer fecha/hora de algún reinicio que ya no esté en eventos o si no había usuario tecleando)
-
- En los artefactos extraídos en relación a GoogleDriveFS, ahora extrae más información que puede ser relevante su análisis.
-
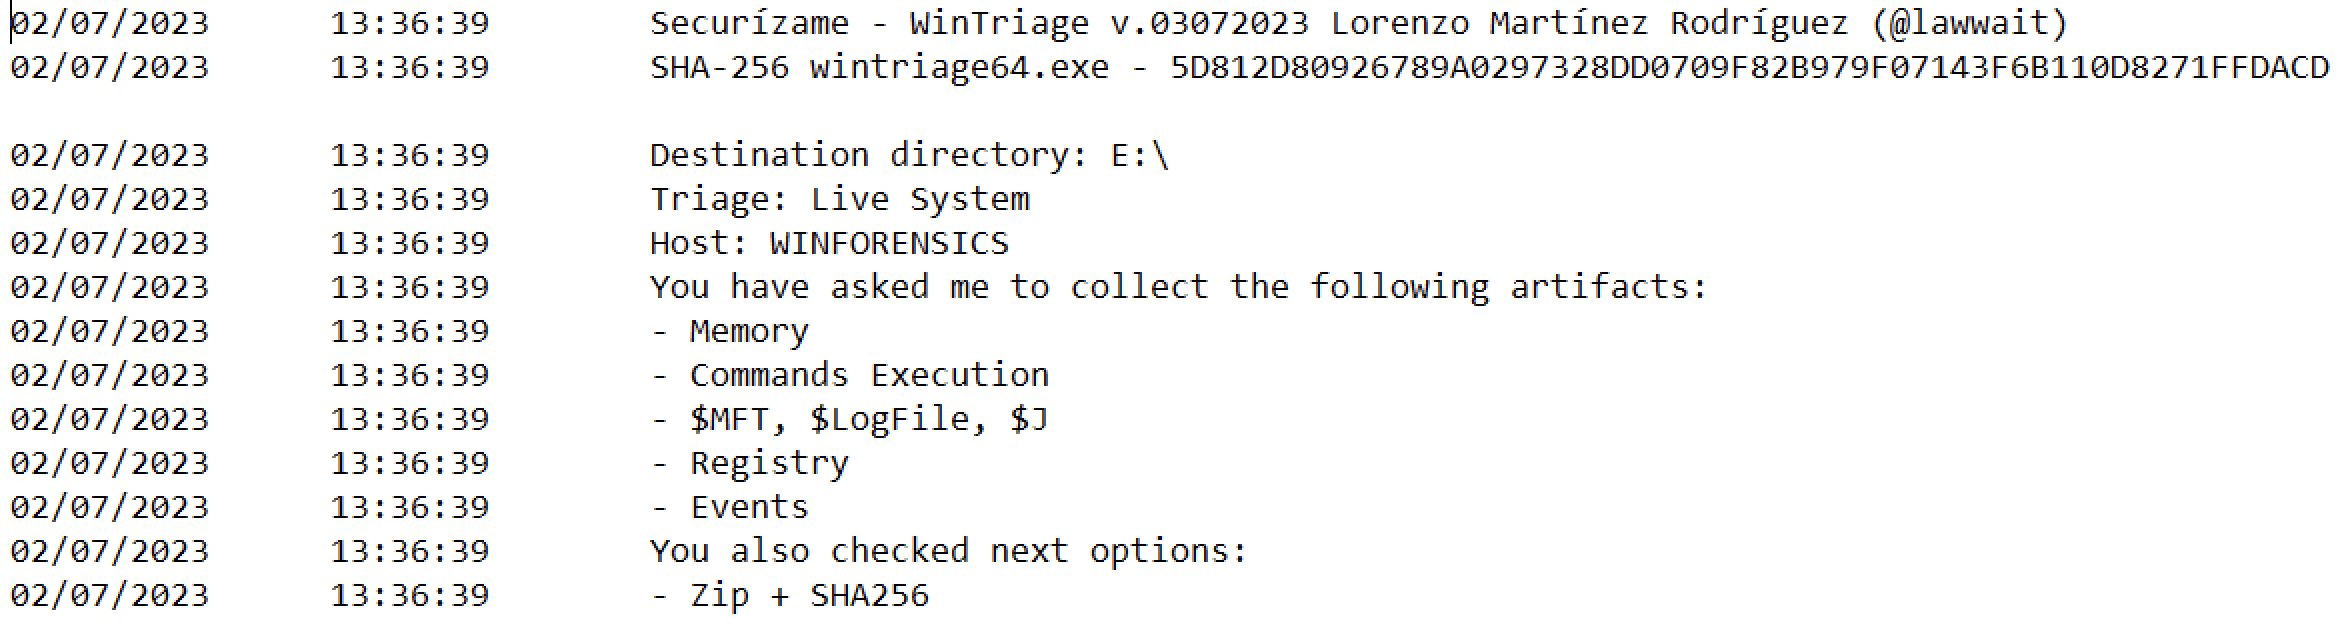
- Hemos mejorado el Logging de wintriage.log. Ahora al principio añade una cabecera con un resumen de las opciones de triage solicitadas en esa sesión, dónde se ha solicitado dejar los resultados, si se trata de una Live Response (y el hostname de la máquina, en ese caso) o es si es una extracción offline. Además, en muchos artefactos, loggea únicamente que ha sacado algo, si es que realmente lo había.
Bugs corregidos:
-
- En la versión CLI de ejecución de Wintriage, el flag «r» servía tanto para extraer el registro como la base de datos SRUM (Software Runtime Usage Monitor). Ahora para extraer este artefacto forense de forma individual, el flag a seleccionar es «b».
-
- Se ha solucionado la forma de extracción de las «Shadow Copies» al ser ejecutado Wintriage via «tsclient» desde un sistema operativo Apple IOS, que tiene sistema de ficheros APFS. Por el funcionamiento interno de este tipo de extracción, necesita crear un enlace dinámico a un objeto Windows que representa un dispositivo por bloques. Al no ser sistema de ficheros NTFS al ejecutar «mklink /d» no funciona y da un error. En este caso, se hace creando un único fichero temporal en el directorio temporal del usuario. Teniendo en cuenta que esta operación se lleva a cabo posteriormente a la extracción de los artefactos $MFT, $LogFile y Journal, no altera el sistema de manera significativa para el análisis.
-
- Lo mismo sucede con la ejecución de ADSecurizame.exe (herramienta auxiliar que se utiliza para la extracción de ADS (Alternate Data Streams). Si se ejecuta desde un «tsclient» en un sistema de ficheros APFS, no funciona. Para esto, directamente si es un sistema de ficheros diferente a NTFS, no se ejecutará.
Otros cambios relevantes:
-
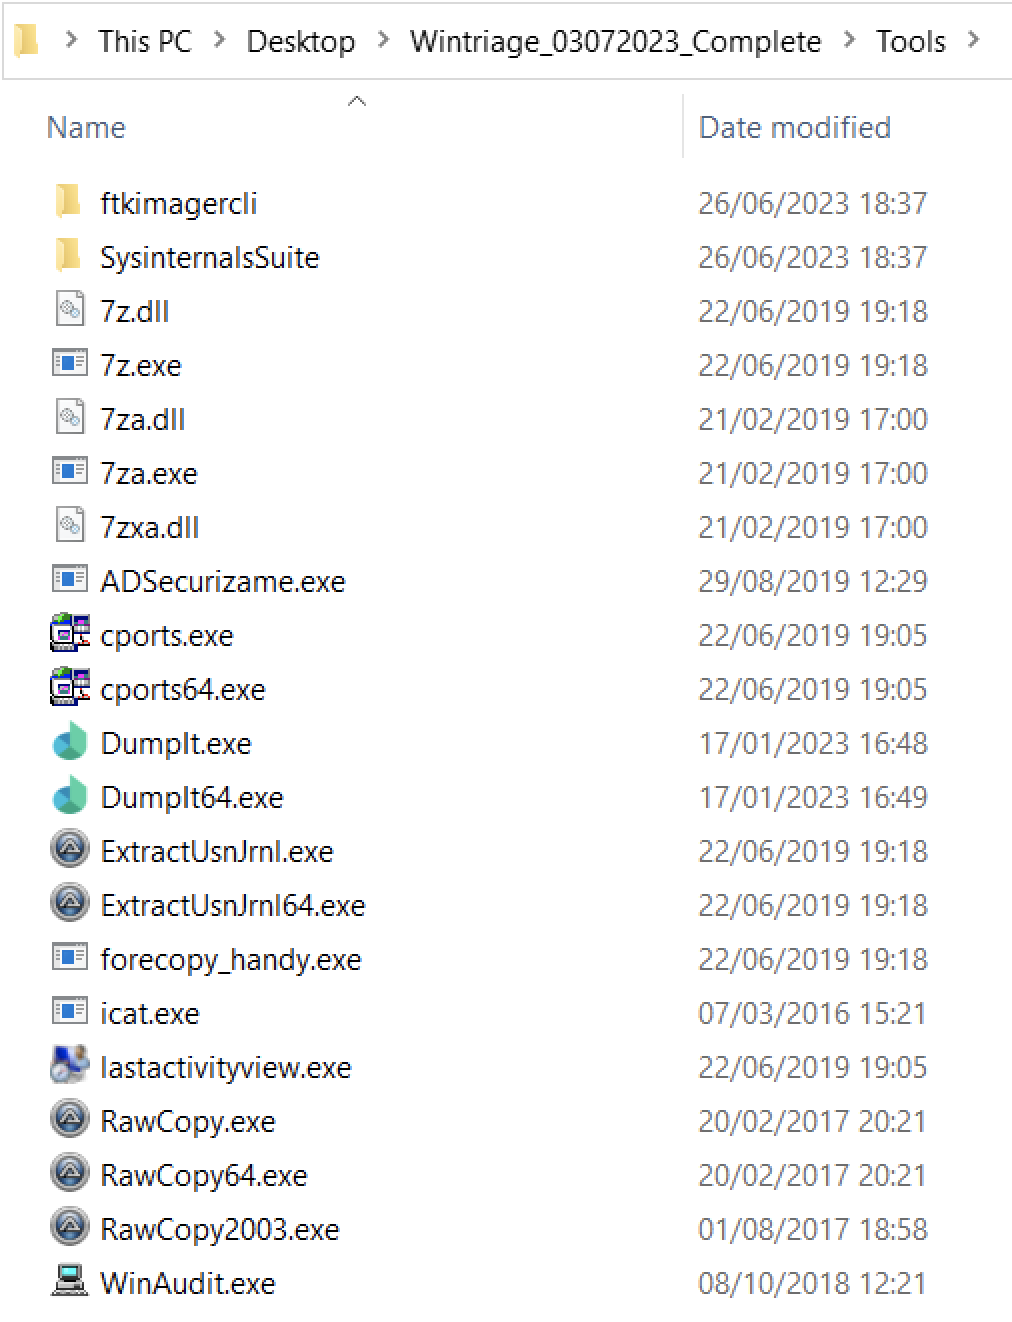
- Dado que para la extracción de memoria con Ramcapture se requiere la carga de un driver en el sistema, cuando se hace desde una unidad lógica local al sistema (un pendrive o disco duro externo conectado) se puede puede hacer sin problemas. Sin embargo, si se hace desde un tsclient o desde una unidad de red, Windows «se defiende» y prohibe su carga. Para poder hacer compatible la extracción de este importante artefacto forense ejecutándolo desde una unidad de red, ahora se utiliza Dumpit en vez de Ramcapture, dado que emplea una técnica diferente. Así que en esta versión se ha eliminado el requerimiento de los 4 ficheros de Ramcapture y se ha añadido dos de Dumpit (los binarios para 32 y 64 bits respectivamente). Así ha de quedar el directorio Tools:
-
- Se ha modificado el fichero Leeme_primero_anda.txt en el que se ha actualizado la dependencia de Dumpit, el enlace a la web de Magnet Forensics para su descarga y cómo renombrar los ficheros descargados en el directorio Tools.
-
- Nos notificaron varias personas que ya no era posible descargar FTK Imager CLI, desde la web del fabricante, por lo que se ha añadido al fichero Leeme_primero_anda.txt el enlace de descarga de FTKImagerCLI, encontrado en Archive.org. De esta manera, nosotros no distribuimos el fichero de forma pública sino que el usuario sigue descargándolo desde su web original.
-
- Hemos deshabilitado que se active por defecto la opción de extracción de ADS (Alternate Data Streams), al consumir mucho tiempo de ejecución respecto al beneficio que aporta. Si se desea activar, habrá que hacerlo a mano en la ventana de artefactos a extraer.
Aprende a usar Wintriage!
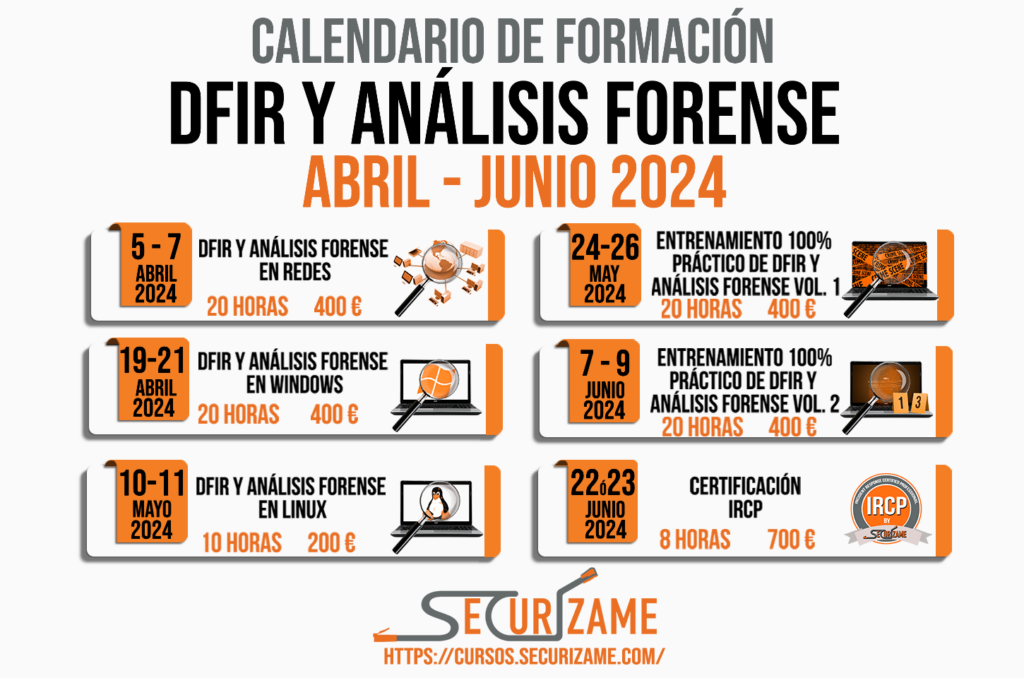
Y a entender e interpretar los artefactos forenses extraídos, en las formaciones de DFIR que impartimos en Securízame. Tienes la opción de llevarlas a cabo en modalidad Online++, cuando quieras, con versiones de los cursos impartidos en 2023 o ir reservando plaza para el plan de formación en DFIR y Análisis Forense en modalidad presencial u online en tiempo real cuyas fechas ya hemos publicado para 2024. Podéis consultarlas AQUÍ.

Como siempre, puedes descargar Wintriage desde https://cursos.securizame.com/extra/wintriage.7z El hash SHA-256 de esta versión es c030f6f1533d2a8eb42eac7e6a03c0ad844e06a8e47c6181f12aec2936be056d

- Wintriage: la herramienta de triage para el dfirer en Windows
- Wintriage 20092020 (20/09/2020)
- Wintriage 24022021 (24/02/2021)
- Wintriage 30102021 (30/10/2021)
- Wintriage 02012022 (02/01/2022)
- Wintriage 18092022 (18/09/2022)
- Wintriage 09042023 (09/04/2023)
- Wintriage 03072023 (03/04/2023)

As usual, when we accumulate a package of improvements for Wintriage, and take some time to implement and test them, we release a new version to the public. In this case it is 03072023.
Usually, Wintriage is used inside an external storage device (a flash drive or a removable hard drive) that we connect via USB to a computer (a PC or a server). However, it’s also the case that it is not always possible to have someone to do this, or that the victim machine is hosted in some kind of cloud provider, and we cannot connect a USB device. In these cases, it’s possible to have a volume to request the client to «connect» to the victim machine, but this already implies a task that, in a crisis, is not always resolved in the desirable time. For these cases, in Securízame what we do is have a repository shared by SMB and NFS towards the Internet, to which we allow the output IP address of the victim machine in our firewalls, and we map this resource from it in order to have a repository where we leave the data extracted by Wintriage, without having to write a single file on the victim machine.
Also, when we connect to the machine (via Remote Desktop), we usually send a drive/folder from the analyst’s PC, where we have different tools that we will surely use: Wintriage, FTK Imager, Nirlauncher, etc,…
A graphical representation of what has been explained can be seen below.
Until the current version of Wintriage, there were certain triage options that we couldn’t select in this mode, as they would fail for different reasons. Now they all work!
Below we describe what this new version of Wintriage brings:
New features added:
- Full support for forensic artifact extraction, even running it from a «tsclient».
- Now we also extract the contents of C:\Windows\System32\Tasks and C:\Windows\Tasks. For this you have to select the «Events» extraction option.
- As a suggestion of Víctor Martínez, a forensic analyst who wrote to us, «powercfg /sleepstudy» is added to the execution of commands in cases where it exists, which generates a sleepreport.html file in the «Reports» directory, with information about sleep times (no equipment activity) (they can be used to know the date/time of a restart that is no longer in events or if there was no user typing)
- In extracted artifacts in relation to GoogleDriveFS, it now extracts more information that may be relevant to your analysis.
- We have improved the logging of wintriage.log. Now at the beginning, it adds a header with a summary of the triage options requested in that session, where the results have been requested to be left, if it is a Live Response (and the hostname of the machine, in that case), or if it is an offline extraction. Also, on many artifacts, it logs only that it has removed something, if it actually was.
Fixed bugs:
- In the CLI version of Wintriage execution, the «r» flag was used to extract the registry but also the SRUM (Software Runtime Usage Monitor) database. Now to extract this forensic artifact individually, the flag to select is «b».
- The way of extracting the «Shadow Copies» when Wintriage is executed via «tsclient» from an Apple IOS operating system, which has APFS file system, has been solved. For the inner workings of this type of extraction, you need to create a dynamic link to a Windows object that represents a block device. Since it is not an NTFS file system, executing «mklink /d» does not work and gives an error. In this case, it is done by creating a single temporary file in the user’s temporary directory. Taking into account that this operation is carried out after the extraction of the $MFT, $LogFile and Journal artifacts, it does not significantly alter the system for the analysis.
- The same thing happens with the execution of ADSecurizame.exe (auxiliary tool that is used for the extraction of ADS (Alternate Data Streams). If it is executed from a «tsclient» in an APFS file system, it does not work. For this, if is a different file system than NTFS, directly it will not run.
Other relevant changes:
- Since memory extraction with Ramcapture requires a driver to be loaded into the system, when it is done from a local logical drive to the system (a USB flash drive or connected external hard drive) it can be done without problems. However, if it’s done from a tsclient or a network drive, Windows «defends» itself and prohibits its loading. In order to support extracting this important forensic artifact by running it from a network drive, Dumpit is now used instead of Ramcapture, since it uses a different technique. So in this version the requirement of the 4 Ramcapture files has been removed, and two Dumpit files have been added (the binaries for 32 and 64 bits respectively). This is how the Tools directory should look like:
- The file Readme_first_and.txt has been modified, in which the Dumpit dependency has been updated, the link to the Magnet Forensics website for its download and how to rename the downloaded files in the Tools directory.
- Several people notified us that it was no longer possible to download FTK Imager CLI from the manufacturer’s website, so the FTKImagerCLI download link, found at Archive.org, has been added to the file Readme_first.txt. In this way, we do not distribute the file publicly, but the user continues downloading it from its original website.
- We have disabled the ADS (Alternate Data Streams) extraction option from being activated by default, as it consumes a lot of execution time compared to the benefit it provides. If you want to activate, you will have to do it by hand in the artifacts to extract window.
Download Wintriage!
As always, you can download Wintriage from https://cursos.securizame.com/extra/wintriage.7z The SHA-256 hash of this version is c030f6f1533d2a8eb42eac7e6a03c0ad844e06a8e47c6181f12aec2936be056d